

Every day, more and more companies experience breaches and loss/leakage of personal data. In many cases, this is the usual phishing and carelessness of users, but there are also many cases where companies neglect security and do not conduct cyber attack testing (Penetration test).
What are TLS/SSL certificates?
To understand why we need TLS/SSL certificates, imagine the situation that you make an online order and pay for it on the Internet. In most cases, you will be asked to enter the number of the bank card and additional information about it, such as the CVV code and the date until which the card is valid. As soon as you have done this and clicked the pay button, your data will be sent to the server, where the authenticity of the card will be checked and a receipt for the purchase of the product will be sent. If everything was successful, the bank withdraws money from the card.
Usually, the data from the website to the server is transmitted in an open form, and if during the request to transfer data to the server, fraudsters can intercept the information, you will not be able to find out about it. Most likely, you will find out that your card data has been stolen only when funds are debited from the card.
So, in order to avoid such situations, you need to encrypt the data that will be sent from the client to the server. There are many data encryption mechanisms and one of the most reliable at the moment is an SSL certificate.
A TLS/SSL Certificate is a digital object that allows systems to authenticate and establish an encrypted network connection with another system using the Transport Layer Security/Secure Sockets Layer (TLS/SSL) protocol.
Two types of encryption are involved in the work of an SSL certificate:
- Symmetric is when one key encrypts and decrypts a message.
- Asymmetric - when there are two different keys: public and private. Public only encrypts the message, every browser can see it. Private only decrypts and is kept secret on the server.
In simple words, all your data will be encrypted and even if fraudsters intercept your personal information, they will have to spend a lot of time to decrypt it.
How to generate a certificate?
We figured out what a certificate is and why we need it. Let's see how we can generate our own certificate. There are many products from which you can get your own certificate, for example LetsEncrypt, Cloudflare, OpenSSL, in this article I will show you how to create a certificate with OpenSSL and also how do it with using .NET/C#.
So, in order to create a certificate with code, all you need is to use the standard library OpenSSSystem.Security.Cryptography.X509CertificatesL.
1
2
3
4
5
6
7
8
9
10
11
12
13
using System.Security.Cryptography;
using System.Security.Cryptography.X509Certificates;

using var algorithm = RSA.Create(keySizeInBits: 2048);

var subject = new X500DistinguishedName("CN=TKovalenko Encryption Certificate");
var request = new CertificateRequest(subject, algorithm, HashAlgorithmName.SHA256, RSASignaturePadding.Pkcs1);
request.CertificateExtensions.Add(new X509KeyUsageExtension(X509KeyUsageFlags.KeyEncipherment, critical: true));

var certificate = request.CreateSelfSigned(DateTimeOffset.UtcNow, DateTimeOffset.UtcNow.AddYears(2));

var password = "942Rq7MIp!nn";
File.WriteAllBytes("tkovalenko-encryption-certificate.pfx", certificate.Export(X509ContentType.Pfx, password));
Do not use this code example for real production-ready applications.
Let's break down what this code example does. First, we said that we want to use the RSA asymmetric encryption algorithm and the size of the thorn in 2048 bits. After that, specify the minimum information about the certificate and specify which hashing algorithm to use for signing the certificate and/or requesting the certificate, and specify the filling mode and parameters for the RSA signature creation or verification operations. We also specified the validity period of the certificate and the password. If you run this code example, as a result of executing this program, you will receive a password-protected certificate tkovalenko-encryption-certificate.pfx.
To generate such a certificate using OpenSSL, you will need to run the following commands in the command line.
Make sure OpenSSL is installed on your PC before running the commands.
First, we need to create a public and private key:
1
openssl req -newkey rsa:2048 -nodes -keyout tkovalenko-encryption-certificate-key.pem -x509 -days 530 -out tkovalenko-encryption-certificate.pem
What does this command mean? We told openssl to generate a new key that will use the RSA asymmetric encryption algorithm in the same size of 2048 bits. -tkeyout - tkovalenko-encryption-certificate-key.pem name of our private key, -x509 - certificate type, -days - certificate validity period in days 530 (2 years), -out - tkovalenko-encryption-certificate.pem name of the public thorn. OpenSSL will then prompt you to enter the certificate details, the same CN=, etc. and at the end we will get the public and private key.
To generate a pfx file we need to execute the following command:
1
openssl pkcs12 -inkey tkovalenko-encryption-certificate-key.pem -in tkovalenko-encryption-certificate.pem -export -out tkovalenko-encryption-certificate.pfx
And yes, we told openssl to use the PKCS12 format to store multiple cryptographic objects in a single file and also specified the names of our public and private keys. -export -out - tkovalenko-encryption-certificate.pfx is the name of our final pfx certificate. After executing this command, OpenSSL will prompt you for a password to protect the certificate.
So as a result we will get a tkovalenko-encryption-certificate.pfx certificate that is protected by a password, just like we did with .NET/C#.
Using TLS/SSL certificates in a .NET application for Azure App Service
And yes, we know what TLS/SSL is, we also know how to generate our own certificate, it's time to add it to our application located on Azure App Service.
To begin with, you need to go to the Azure portal, select the desired App Service, after that you need to go to the certificates section and download your pfx. Click Validate, if the password and certificate are correct, you can add it to Azure App Service.
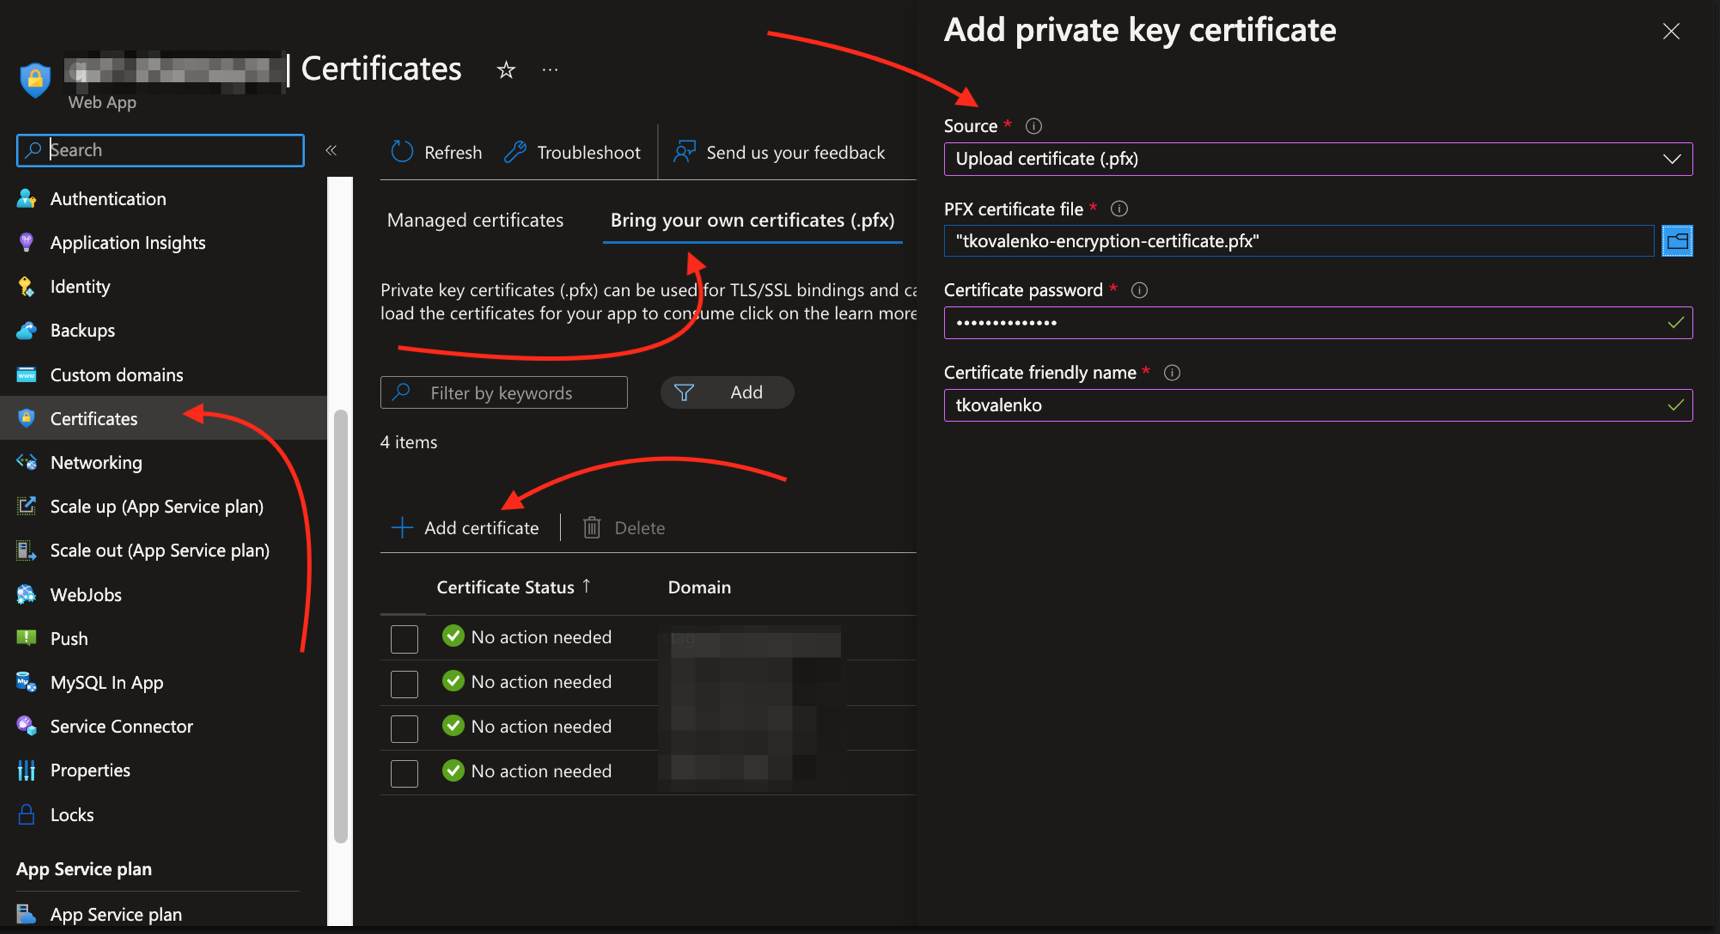
Azure will not allow you to download a certificate that is not password protected.
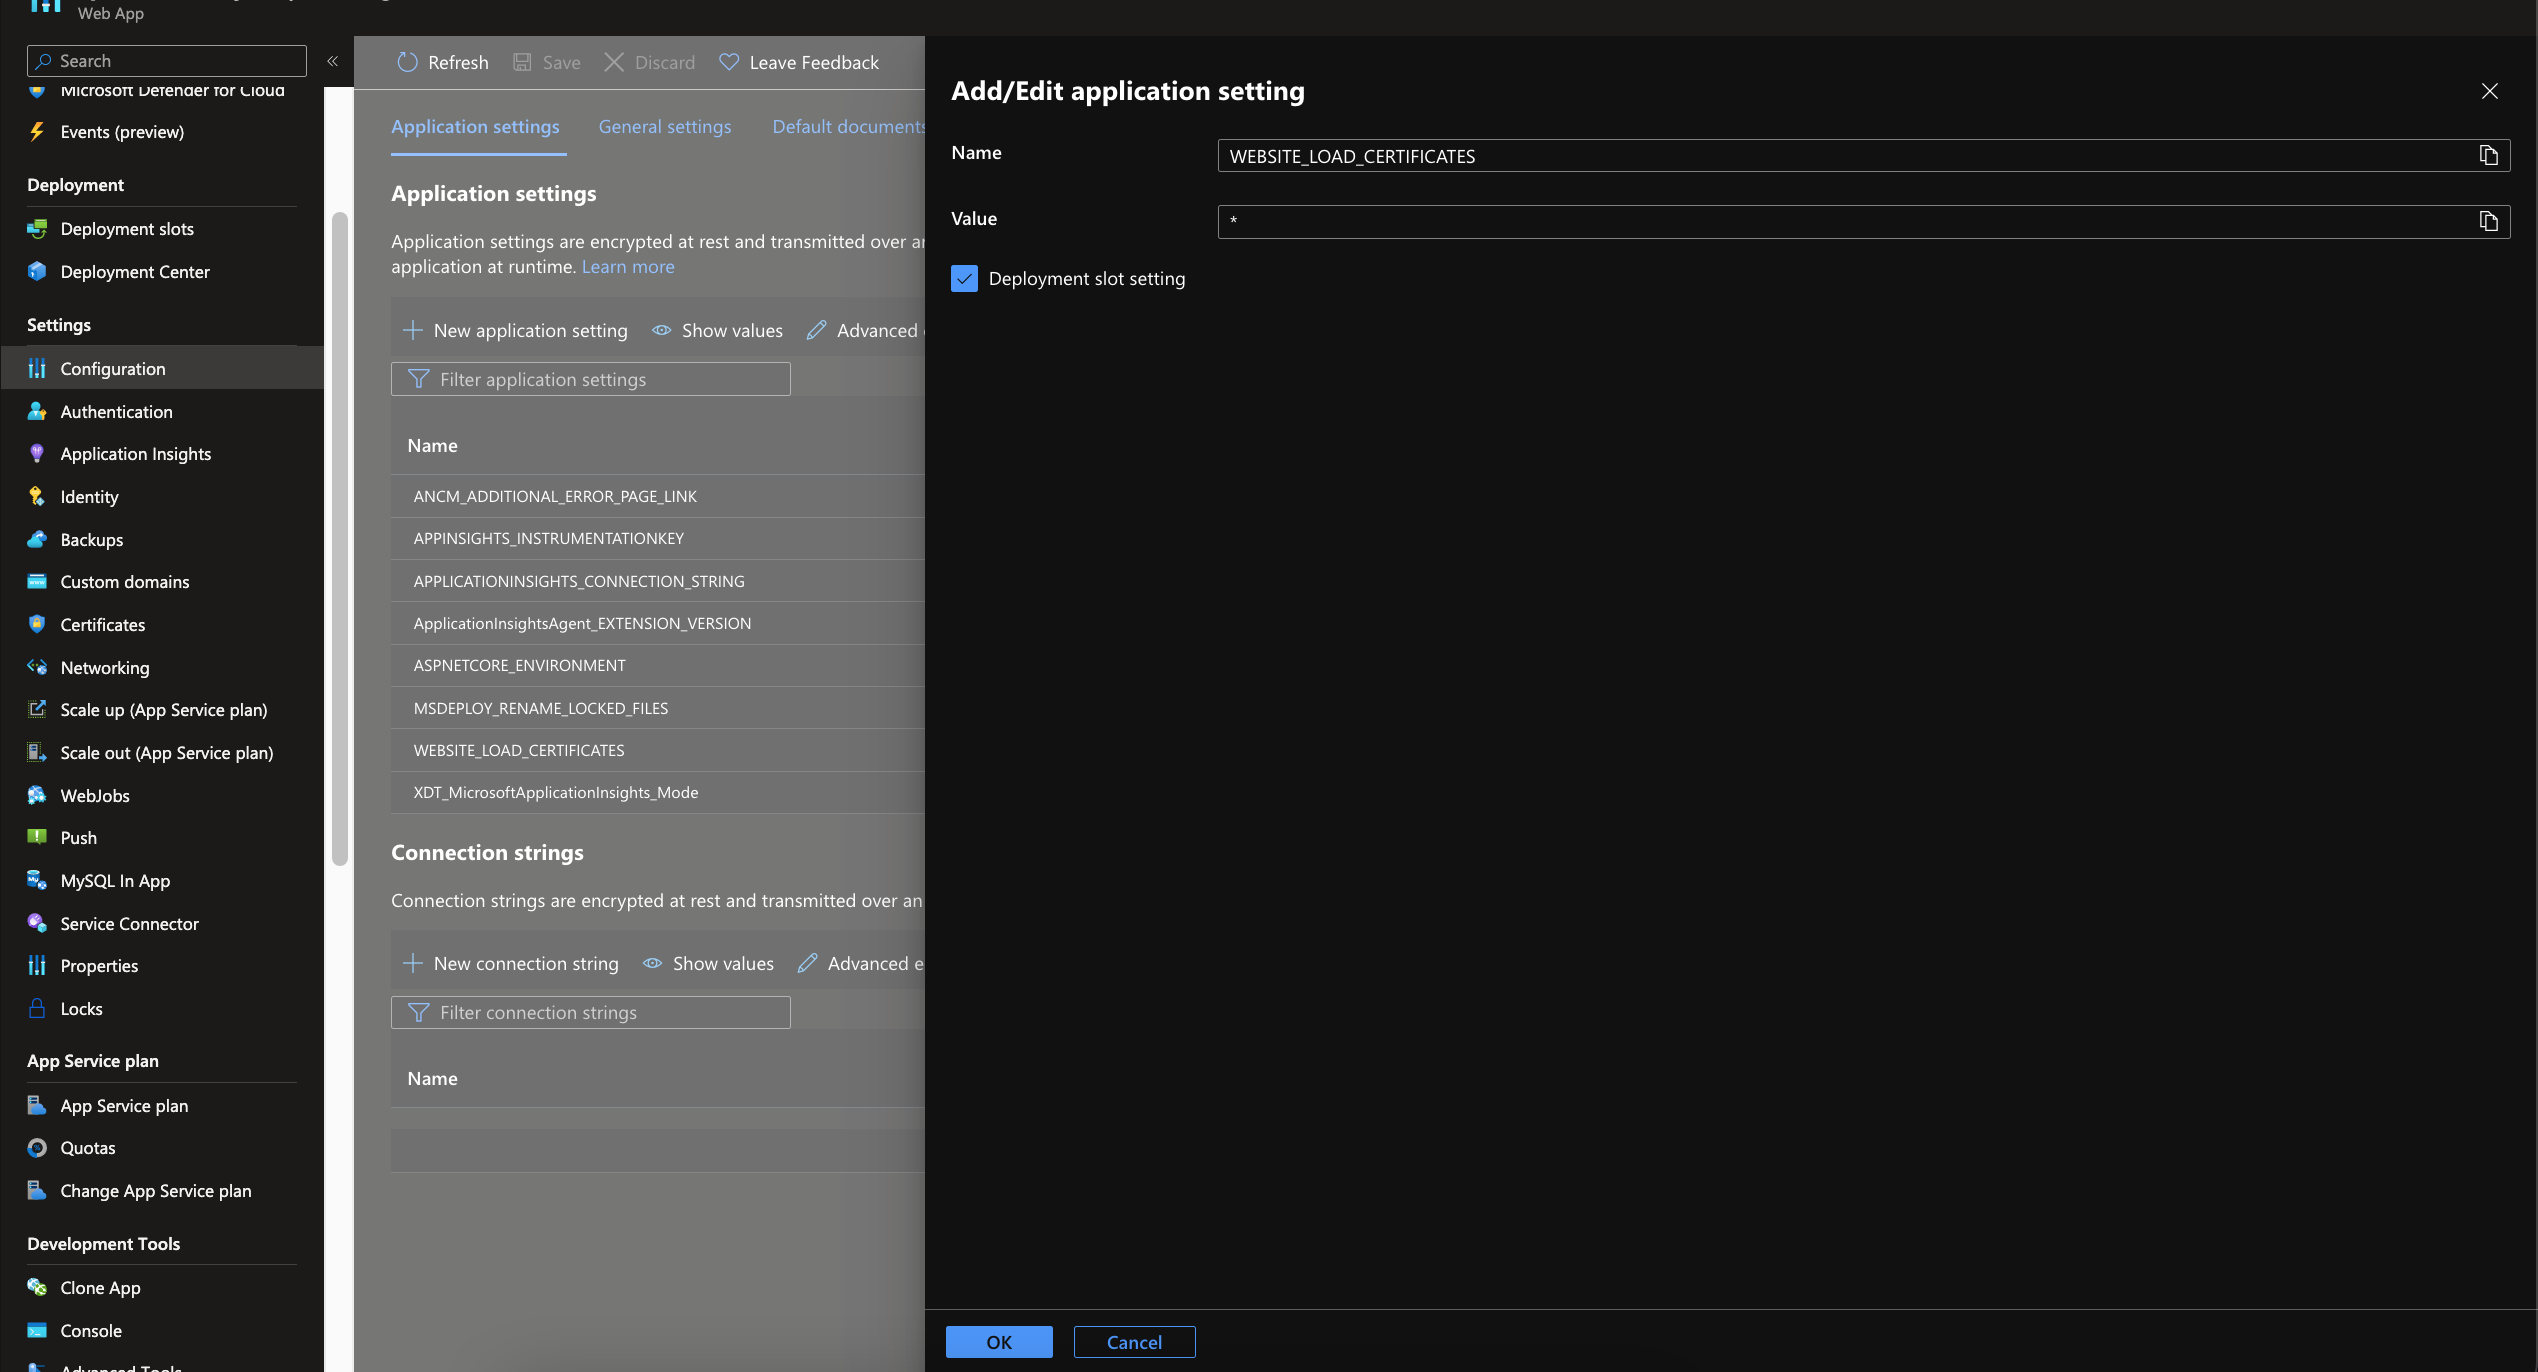
The certificate is uploaded to our App Service, but we can't use it yet because we don't have access to it from the code of our future application.
To fix this, you need to go to the configuration section and add a new app setting, WEBSITE_LOAD_CERTIFICATES with the value * and restart App Service.
Reading the certificate from the .NET application
We've generated and uploaded the certificate to Azure App Service, so it's time to read it from our application and start using it to protect data:
1
2
3
4
5
6
7
8
9
10
11
12
13
14
15
16
17
18
19
20
21
22
23
24
using System;
using System.Linq;
using System.Security.Cryptography.X509Certificates;

public static X509Certificate2 GetX509Certificate(string thumbprint)
{
  var store = new X509Store(StoreName.My, StoreLocation.CurrentUser);
  try
  {
    store.Open(OpenFlags.ReadOnly);
    var certificateCollection = store.Certificates.Find(X509FindType.FindByThumbprint, thumbprint, false);

    if (certificateCollection.Count == 0)
    {
      throw new Exception("Certificate is not installed");
    }

    return certificateCollection.First();
  }
  finally
  {
    store.Close();
  }
}
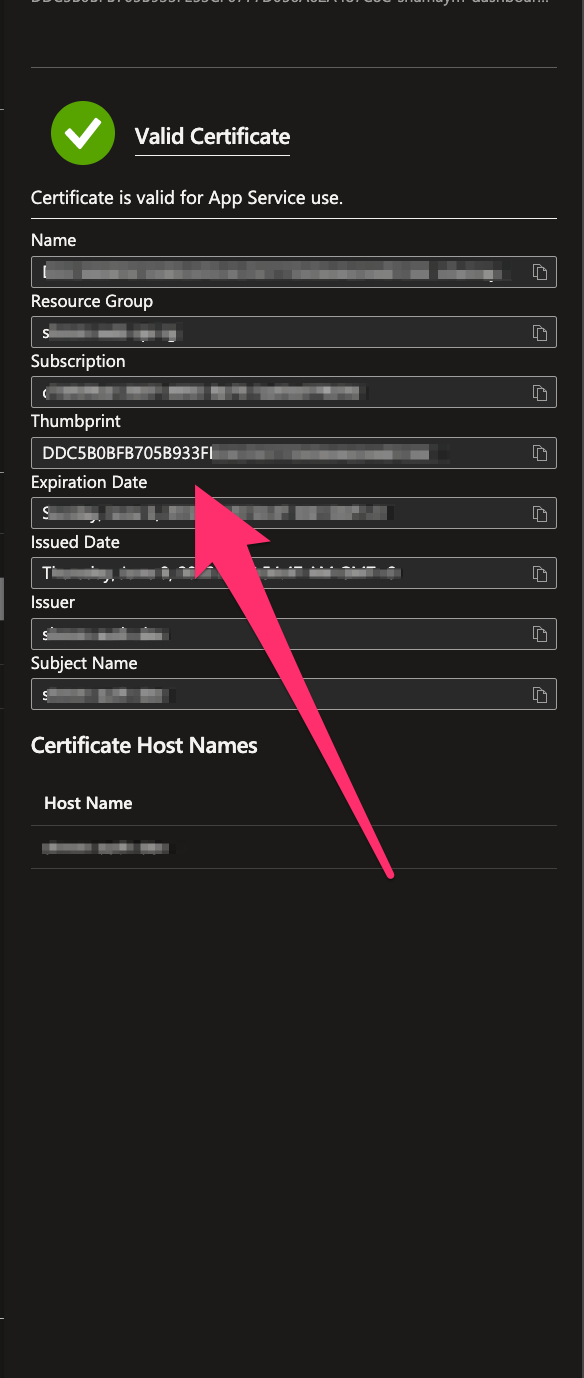
The GetX509Certificate method expects the input parameter thumbprint (this is a unique identifier for the certificate) and looks for the certificate for the current user.
To get a thumbprint we need to go back to the Azure portal select our App Service and go to the certificates section and view the certificate information.
Conclusion
We figured out what TLS/SSL certificates are, why they are needed, how to generate your own certificate and upload it to Azure App Service and access it from our application for further use.